EN
EN
 AR
AR
 HR
HR
 CS
CS
 DA
DA
 NL
NL
 FI
FI
 FR
FR
 DE
DE
 EL
EL
 HI
HI
 IT
IT
 KO
KO
 NO
NO
 PL
PL
 PT
PT
 RO
RO
 RU
RU
 ES
ES
 SV
SV
 TL
TL
 IW
IW
 ID
ID
 LV
LV
 LT
LT
 SR
SR
 SK
SK
 SL
SL
 VI
VI
 SQ
SQ
 ET
ET
 HU
HU
 TH
TH
 TR
TR
 MS
MS
 IS
IS
 LA
LA
 KK
KK
 UZ
UZ
 KY
KY
How door conceal hinge is installed in the door?
The Perfect Fit: How Door Size Dictates Hinge Quantity and Position
When designing or installing interior doors, the focus is often on aesthetics—the material, the finish, or the handle. However, the true unsung hero of a door’s longevity and performance is the hinge. Getting the relationship right between door size, hinge quantity, and hinge positioning is crucial to preventing sagging, ensuring smooth operation, and maintaining a flawless structural alignment over time.
Understanding the Blueprint: Door Size vs. Hinge Quantity
The rule of thumb for hardware installation is simple: as a door gets taller or wider, the physical stress on the frame increases. To counteract this leverage and distribute weight effectively, you must adjust the number of hinges.
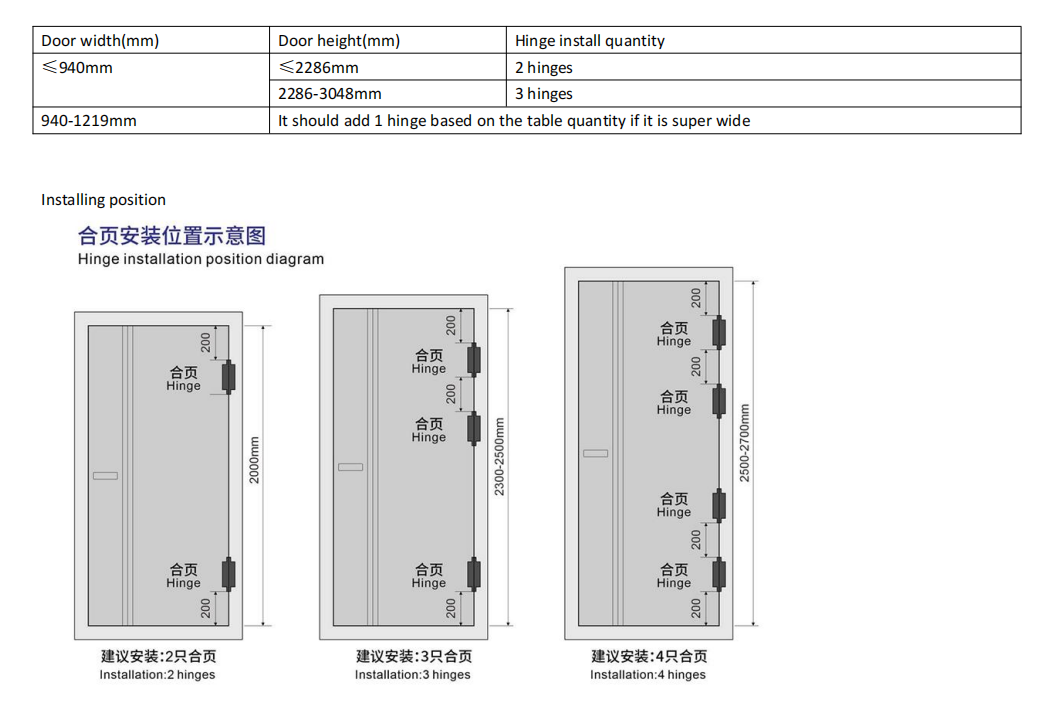
According to professional installation standards, doors are categorized into specific height ranges to determine the necessary hardware load
-
Standard Doors (Up to 2000mm – 2286mm): For typical residential doors under 2286mm in height, 2 hinges are recommended to sufficiently anchor the door panel
. -
Tall Doors (2286mm – 2500mm): Once a door reaches this height, a third hinge is required to prevent the wood or composite material from bowing in the middle
. This setup utilizes 3 hinges . -
Oversized/Grand Doors (2500mm – 2700mm and up): Heavy architectural doors require a robust structural network. For doors stretching up to 2700mm, 4 hinges are mandatory to handle the massive vertical tension
.
The "Super Wide" Exception: Door width plays just as vital a role as height
. If a door panel is exceptionally wide—specifically between 940mm and 1219mm—it exerts intense lateral leverage on the top hinge . In these cases, you should add 1 additional hinge to the total recommended by the height chart to safely carry the extra load .
The loading weight based on conceal hinge quantity
Eg 2hinge GE60 loading is 60kgs :3 hinge GE60 loading is 60*1.3=78kgs 4hinge GE60 loading is 78kgs *1.1=85.8kgs
The Art of Placement: Hinge Position Diagrams
Simply adding more hinges isn't enough; their placement dictates how effectively they fight gravity. Looking at a standard installation position diagram, a highly strategic grouping method is utilized to maximize structural integrity
Instead of spacing hinges evenly down the entire length of the door, professional engineering clusters them toward the areas under the most stress.
1. The Top and Bottom Anchor Points
Regardless of the door height, the primary top hinge is placed 200mm from the top edge of the door panel, and the lowest hinge is placed 200mm from the bottom edge
2. The Heavy-Duty Cluster Technique
When a door requires 3 or 4 hinges due to an extended height of 2500mm to 2700mm, the extra hardware is not placed in the exact center of the door
On a 4-hinge grand door, for example, you will find two hinges clustered at the top (separated by 200mm) and two hinges clustered at the bottom (separated by 200mm)
Conclusion
A door is only as good as the hardware supporting it. By strictly honoring the relationship between a door’s dimensions and its hinge configuration, you safeguard your installation against warp, drag, and premature wear. When dealing with premium, flush-to-wall modern doors, referencing precise installation diagrams and keeping that crucial 200mm spacing in mind ensures your architectural vision operates flawlessly for decades